Thursday, December 15, 2011

The Longest Before & After

Once in a while you have a project that you feel as if you will NEVER EVER EVER finish.  This is one of those projects.  Yes these "before" pictures are taken sometime during the summer.  Note the sunshine and dry grass.  To start with this chifforobe http://en.wikipedia.org/wiki/Chifforobe was not easy to move around.  I'm embarrassed to say it sat on my front porch (yes hill billie style) for longer than I or my neighbors care to talk about. Secondly, I just wasn't sure how to finish it.  I saw it as fun piece with different rough finishes and crazy hardware.  What I ended up with was a little bit away from the first idea, but ultimately a better idea.   


A Better Picture was not to be had, this baby is tough to move.

The finish was really rough, but that was a lot of the charm for me.  There were pieces and parts missing.  I decided to cannibalize one other piece and just attach it on the bottom of this piece

 
The white trim on the bottom came off of a book case that didn't make it.  I played Taps in the background, so it's okay. 


We took the front door off and had glass put in.  I actually bought this piece just for the door at an auction.  I had not previewed it and knew it was rough.  I wanted to just mount a mirror in the door and lean it against a wall in my house.  Once I got it home, I realized it was worth saving.


Laying on it's side waiting for the makeover
  I decided I wanted to keep as much character as possible without letting the piece look too sloppy.  I left the bowed wood in the back.


Bowed wood in the back. 


Wasn't sure if I should paint this great detailing.


The front


From the top


  Once I got the glass in and the drawers out, I decided to go with Annie Sloan Chalk Paint in a Paris Grey wash.  I wanted the rough wood to show through and use a white washed or limed finish.


One light coat of Paris Grey

Once I got the whole outside painted, I decided to go with a pop of color on the inside.  I didn't want it to be too boring.  I painted the inside with a wash of Provence.  When it was done I just waxed it with Annie Sloan Clear Wax, buffed it up a little and it was done.
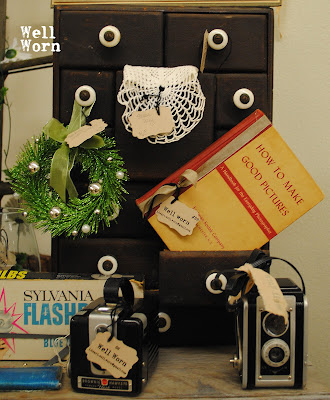

Fun Camera display on the top


Some rich turquoise items to play off of the Provence


Rough inside before and after


A little more Turquoise

  
The big picture in all of her glory


It looks rougher in the picture than it does in person.  I think its a interesting addition to the booth at Well Worn.

I hope you like it.

Be Merry,

Melony


Sharing with  Furniture Feature Fridays

Friday, December 9, 2011

Morticia would be Proud

Christmas at Well Worn came a little earlier than I had planned.  I had taken some time off of work with the idea that I would decorate for Christmas the day following Thanksgiving.  I'm one of those people who doesn't appreciate Christmas prior to Halloween.  I didn't know that the downtown Chico Christmas preview is the week before Thanksgiving.  So I was told that all of the vendors in our antique mall decorate a few days before, in honor of the Christmas Preview. Since this is my first year as a vendor at the mall, it was a little surprise.  I had intended to do an off white tree with hints of burlap and silver.  Fortunately, I did a quick look around the store and someone else had done an artful job of decorating their booth with an off white tree with burlap and silver...whaaaa?  Don't you hate it when you think you have a good idea only to find that someone else has the same good idea?  What's worse, is when you see it and they probably did a better job executing the idea than you probably would have.  Dratted "frolic girls".  Kidding, I love their booth and creativity.

So, on to plan "B".  I had a beautiful selection of french antique postcards that I wanted to use as ornaments on my tree.   Most were in warm tones of black and cream, so I thought they would look great on a off white tree.  I still wanted to use the postcards, so now what?  A black tree?  Hmm.  I don't know, I really like glitter, white, gold and a beautiful green tree.  The thought brewed and stewed for a couple of days and I just decided to do it.  Since I didn't have time to order a black tree, I went to our local Salvation Army and bought a fake tree.  Next step, paint the thing.  I would not advise that you paint a fake tree.  It's a huge pain.  When you are in the middle of the process and really wondering if it's a good idea, it's not helpful if your daughter comes home and states "that's festive".  I was halfway in the middle of the black mess, very doubtful and wishing I could stop, but too committed to stop.  Should you decide to paint a tree, put the first coat on with the cheapest Walmart flat paint, then follow with semi-gloss, shimmer or whichever type of paint you would like on top.  If you try to paint with any of the less flat paints, it will just slide off of the branches.  Don't ask me how I know.   
The other problem with painting a fake tree is the smell.  It's really stinky for a few days.  I didn't put lights on my tree, I'm not sure if it's more flammable than a non-painted tree, I really don't want to know.

I also decorated the tree with dictionary page garlands and flowers.
I wanted a tree that was different and set the booth apart from the other vendors.
Here are a few pictures...what do you think?   

Dictionary flowers and Garlands

Decorated with Antique Postcards & Shoe Forms


Vintage Ornaments as well as flour sifters make good ornaments


Dried Hydrangeas to soften the black


No, Virginia, not your usual tree.


German Glass Glitter Banner and a Dictionary page wreath
 Wishing you days and Holidays that are Merry & Bright,
Melony

Pages